
How to install Java
To run the java file, you need to download the JDK (Java Development Kit). JDK is software which is used to compile and run the Java program.
You need to
download the JDK latest version which will be consisting of the compiler and a JVM
(Java Virtual Machine).
The compiler
will help the Java program to convert into machine understandable codes also
known as the byte codes. After the process of compilation will be finished, the
byte codes will be run in the machine through JVM.
So without
JDK you won’t be able to run and execute java programming language.
Which JDK
version to be installed for Mac and Windows:
Since JDK
has different versions, so you might get confused which version is compatible with
your pc/mac.
You should
always download the long term support version of JDK. If you download the short
term support version, then the support will be for a limited period, may be 6
months or so.
JDK version
8 and version 11 are the long term support version of JDK. Mac operating system
is best compatible with JDK version 11.
Since
windows system is divided into 32-bit and 64-bit operating system, hence this
might be tricky for you to choose the right version of JDK.
For 32-bit
operating system, you need to install JDK version 8 and for 64-bit operating
system, you need to download JDK version 11.
To check
whether your pc is 32-bit or 64-bit operating system, do right click on my
computer and go to properties. In properties window, you will find your system
type.

Go to your
computer browser and type JDK download.
Click on the
first link (www.oracle.com)

Now you will
be landed on the Java standard edition download page.
Since we are
using Windows 64-bit operating system, we are downloading JDK version 11. You
can download the required version of JDK as per your system requirement.
Just click
on the JDK download link and your downloading will start immediately.
Note: You have to
create an oracle account in order to download the JDK. Without an account, you
won’t be allowed to download the JDK. The account opening process is very
simple. You just have to fill the basic information in the form and your
account will be activated immediately. You will also get a verification email in
your given email id.

After the
download process will be finished, you have to install the JDK in your system.
The installation process is very simple. You just have to follow the step by
step instructions and your Java will be installed easily.
To install
Java in your machine, just double click on the JDK.

Now just
follow the instructions. In few steps you will get Java installed in your
computer.
You just have
to keep the settings as default and click on the next button.

In order to check
whether Java has successfully been installed in your computer, just open the
command prompt and type the bellow command.
java -version
As soon as
you type the above command and hit the enter button, it will immediately show
you the Java version installed in your machine.

Sometimes,
your computer may not find the JDK file location even after a successfully JDK
installation. In that case you have to tell your computer the exact location of
JDK file.
Otherwise
the command prompt might show error as your computer could not identify the exact
JDK location.
Don’t worry.
You can easily fix this issue.
Just trace
the path to the bin folder inside
the JDK. The JDK is normally installed inside the C drive of your computer.

Now copy the
path and paste it to the environment
variable. Once you paste the path to the environment variable, your machine
will get to know where the JDK has been installed in your machine.
How to find the environment variable
in your computer:
Go to the properties of your computer.


Click on the
Environment variables button.

Now edit the
value of path variable under the system variables section.

You have to
paste the path in the variable value field and click on ok button.

That’s it.
Now the environment variable has been set which will let your computer know the
exact location of JDK.
Go ahead and
type the same command in the command prompt and the command prompt will surely
return the java version of your computer this time.
How to run your first Java code:
After
installing JDK, your computer is fully capable to compile and run a Java
program now.
Let’s see
how we can write our very first Java program and execute the same.
Step 1:
Open your notepad and type the below java
program.

You have to save the file in the same name as mentioned in the public class with a .java extension.
If you are
not being able to understand the codes written above, you don’t have to be
worried at all.
We are going
to discussion everything in detail in our other future lessons.
Now open
your command prompt and go to the
location where you have saved your notepad file.
In our case,
we have saved our notepad file in desktop, so we go to desktop.
In command
prompt write javac Filename.java (filename with
extension) and press enter. This will allow the compiler to compile the
java codes into machine readable byte codes.
Note: After
compilation, you will notice there is another file with .class extension at the
same location where your .java file was saved. This file contains byte codes.
Then you
have to pass java Filename (filename without extension) command
and this will show you the message inside the java program.

Congratulations!
You have successfully compiled and run your first java program.
You could
observe the entire compilation and execution of the program took place without
the help of any IDE (Integrated
development environment).
Installing IDE for Java programming:
As you have noticed,
we did not use any IDE to execute our first java program.
IDE stands
for an integrated developing environment where you get most advanced features
which are going to help you a lot and make your programming experience smooth
and enjoyable.
We are using
here Eclipse IDE to compile and run
our Java program.
How to download Eclipse IDE:
Go to Google.com
and search for Eclipse IDE download.
Open the first website (www.eclipse.org).
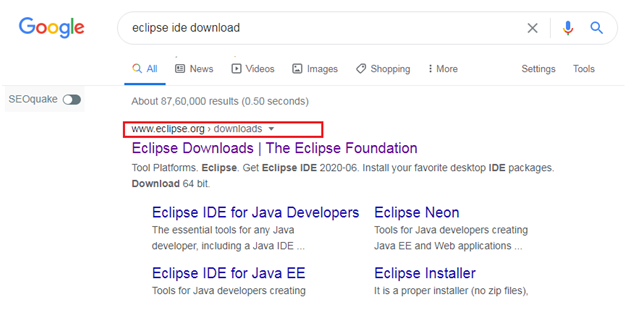
Click on the download button. As soon as you click on download button, your download will automatically start.

After
downloading completes, install the IDE. The installation process is very
simple. You just have to follow the instructions and thereby your IDE will be
ready to use.
How to run Java program in Eclipse
IDE:
It’s very
easy to run a Java program in Eclipse IDE.
Unlike a
notepad, your Eclipse IDE will automatically show you any probable error if
occurs during the coding process.
The IDE also
shows the programming codes in different colors that help the coder understand
their codes better.
It provides
auto-complete feature for coding and also one-click compilation and program
executive feature.
After you
have successfully installed your Eclipse IDE, launch the IDE.
In order to
write your first Java program, click on Create
a Java project.

Write a project name and click on Finish button.

Have a look
at the project explorer now.
There are 2
folders automatically created under your given project name.

Right click
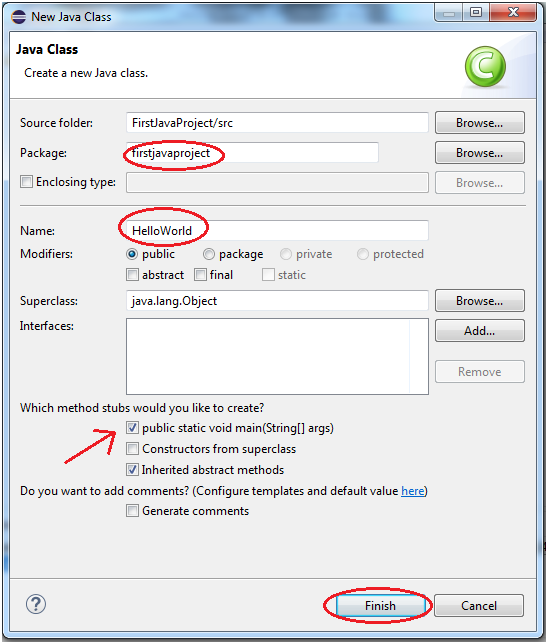
on the src folder go to New and click on Class.
Now give a package name and class name.
Also make
sure that the “public static void
main(String[] args)” method stub is
checked.
And finally
click on the Finish button.
Now you will
see, a .java file has already been created and lot of program codes have
already been written by the IDE.

To print Hello World in the console, add the
below codes and click on the RUN button.
System.out.println("Hello World !");
As soon as
you click on the run button, your
program will be compiled and executed.
You will also
be able to see the Hello World
message in the console.

Congratulations!
You have successfully been able to run your first Java program in Eclipse IDE.
 Reviewed by Technobits
on
February 24, 2021
Rating:
Reviewed by Technobits
on
February 24, 2021
Rating:


No comments: